Every cat owner knows that rhythmic “thump-thump-thump” of a hind leg scratching an itchy ear. Cleaning cat ears is more than just a grooming chore; it’s a vital part of preventative health that keeps your feline friend comfortable and helps you spot potential issues before they become painful infections. While the idea of poking around your cat’s sensitive ears might feel a bit intimidating, it can actually be a wonderful bonding moment when done with patience and the right technique.
Maintaining hygiene doesn’t have to be a struggle. By learning the proper way of cleaning cat ears, you are essentially acting as a guardian for their hearing and overall well-being. Whether you are dealing with a little bit of wax or just want to stay ahead of the game, this guide will walk you through the process as smoothly as possible.
Before we dive into the steps, it’s always a good idea to ensure your cat is relaxed. If your kitty is a bit feisty, you might want to learn how to trim cat nails safely first to avoid any accidental scratches during the process. Understanding your cat’s tail language can also help you read their mood and stop if they get too stressed.

Table of Contents
- ✨ Expert Tip
- 🔍 Identifying the Signs: Does Your Feline Friend Need Help?
- ⚠️ Common Symptoms to Watch For
- 🦟 Spotting the Difference: Ear Mites Signs
- 📝 Quick Summary
- 🛠️ Preparing Your Kit: The Right Cat Ear Cleaning Solution
- 🛑 What to Use vs. What to Avoid
- 💡 Why a Specialized Solution Matters
- 🛡️ Safety First
- 🧼 Cleaning Cat Ears: A Safe Step-by-Step Guide
- Step 1: Create a Calm Environment
- Step 2: The “Purrito” Secure Wrap
- 🌯 Expert Tip: The Purrito Technique
- Step 3: Apply the Solution
- Step 4: The Deep Massage
- Step 5: The Shake and Wipe
- Step 6: Positive Reinforcement
- 🚩 When Home Care Isn’t Enough: Knowing the Limits
- 🚫 Red Flags: When to Stop Immediately
- 🏥 The Importance of a Professional Diagnosis
- ⚠️ The Golden Rule
- Preparing for the Vet Visit
- ❓ FAQ for Featured Snippets
✨ Expert Tip
Never use cotton swabs (Q-tips) inside the ear canal. Just like in humans, these can push wax deeper or even damage the delicate eardrum. Stick to soft cotton rounds or gauze for a safe, professional touch.
🔍 Identifying the Signs: Does Your Feline Friend Need Help?
Cats are masters at hiding discomfort, but their ears often tell a story they can’t put into words. Before you jump into cleaning cat ears, it’s crucial to observe your pet’s behavior and the physical state of their ear flap. A healthy ear should be pale pink, clean, and odorless. If you notice a “yeasty” smell or see your cat constantly tilting its head, it’s time for a closer look.
⚠️ Common Symptoms to Watch For
If your cat displays any of the following, they likely need a gentle cleaning or a trip to the vet:
- Excessive Scratching: If your kitty is pawing at their ears more than usual, it’s a clear cry for help.
- Frequent Head Shaking: This is a common way cats try to dislodge deep-seated wax or debris.
- Visible Wax Buildup: Dark brown or black gunk is a major red flag that it’s time for a thorough cleaning cat ears session.
- Unusual Odor: Healthy ears don’t smell. A pungent or sweet odor often indicates an underlying issue.
- Inflammation or Redness: Swelling of the ear flap suggests irritation that needs immediate attention.
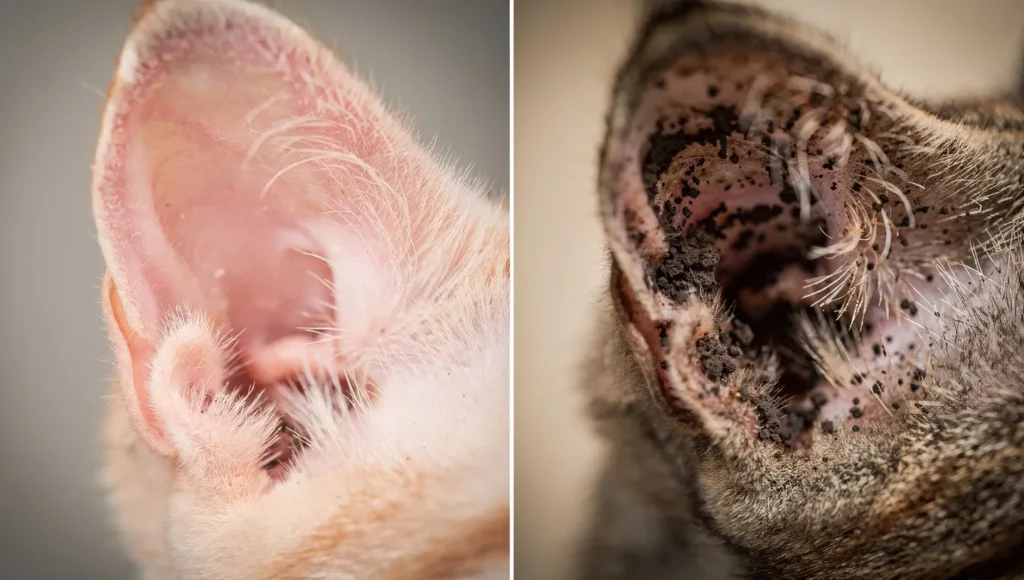
🦟 Spotting the Difference: Ear Mites Signs
Many owners confuse simple wax with parasites. Knowing the specific ear mites signs can save your cat from weeks of itching. Unlike normal earwax, mite debris looks like dry, black coffee grounds. If you see tiny white specks moving within that debris, those are the mites themselves. If you suspect an infestation, it is vital to learn how to tell if your cat is sick to monitor for secondary infections.
| Feature | Normal Earwax | Ear Mites Signs |
|---|---|---|
| Color | Light brown or yellowish | Dark brown or black |
| Texture | Waxy and slightly oily | Dry, crumbly (like coffee grounds) |
| Odor | None or very mild | Often has a strong, foul smell |
| Movement | Static | May see tiny white moving specks |
📝 Quick Summary
If the ear is just a bit dirty with light wax, a home cleaning is perfect. However, if you see “coffee ground” debris or your cat seems in pain, these are classic ear mites signs that require a professional diagnosis before you attempt any DIY cleaning.
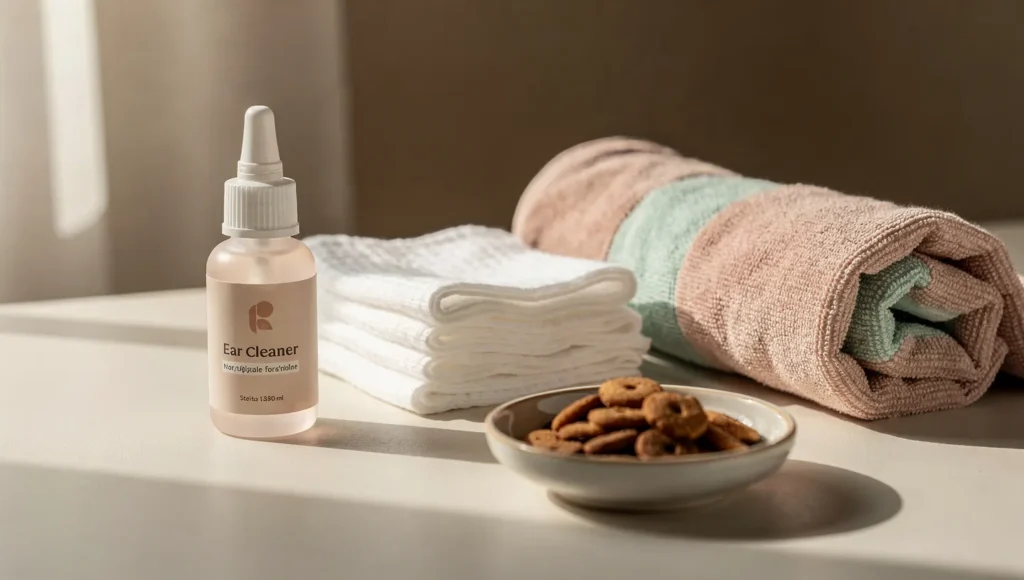
🛠️ Preparing Your Kit: The Right Cat Ear Cleaning Solution
Success in grooming starts with the right tools. You wouldn’t use dish soap to wash your face, and the same logic applies to your feline’s delicate ears. Choosing a high-quality, vet-approved cat ear cleaning solution is the single most important step in this process. A proper solution is specifically formulated to break down wax and debris without disrupting the natural pH balance of the ear canal.
Before you reach for that cat ear cleaning solution, remember that safety starts with the paws. If your cat is prone to squirming, it is highly recommended to follow our guide on how to trim cat nails safely. Having blunt nails will make the experience much safer for you if your kitty decides to push back during the cleaning.
🛑 What to Use vs. What to Avoid
Using the wrong liquid can cause permanent damage, deafness, or intense pain. Use the table below to ensure you have the safe essentials.
| ✅ Safe to Use | ❌ Strictly Avoid |
|---|---|
| Professional Cat Ear Cleaning Solution (Alcohol-free) | Hydrogen Peroxide (Causes irritation and damage) |
| Sterile Gauze Pads or Cotton Rounds | Rubbing Alcohol (Extremely painful and drying) |
| A Soft Towel (For the “purrito” wrap) | Cotton Swabs / Q-Tips (Pushes wax deeper) |
| High-Value Treats (For positive reinforcement) | Plain Water (Can get trapped and cause infections) |
💡 Why a Specialized Solution Matters
A dedicated cat ear cleaning solution often contains drying agents that prevent moisture from sitting in the ear, which is a leading cause of yeast infections. If you are unsure which brand to pick, look for ingredients like salicylic acid or lactic acid, which are gentle yet effective at dissolving stubborn wax.
🛡️ Safety First
Always ensure the cat ear cleaning solution is at room temperature. Cold drops inside a warm ear canal can be a shocking and unpleasant sensation for your cat, making them fear future grooming sessions.
🧼 Cleaning Cat Ears: A Safe Step-by-Step Guide
Now that you have your supplies ready, it’s time to perform the actual cleaning cat ears process. Remember, the goal is to be quick, gentle, and positive. If at any point your cat becomes overly stressed or aggressive, stop and try again later. Following this step by step approach will help you maintain control while keeping your feline friend at ease.
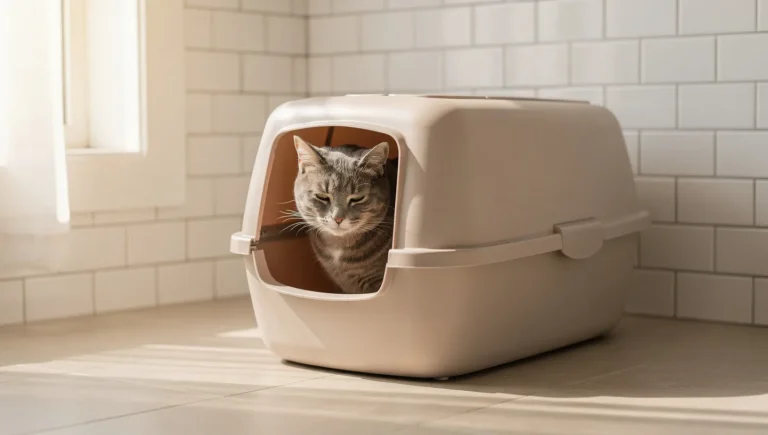
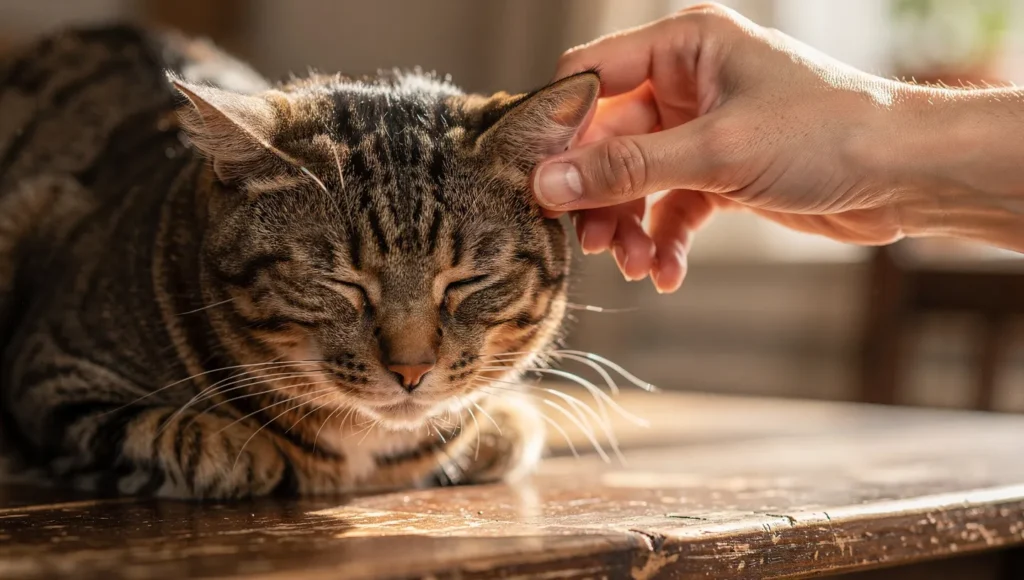
Step 1: Create a Calm Environment
Choose a quiet room without distractions. Start by petting your cat in their favorite spots. You can observe their cat tail language to ensure they are relaxed before you begin. A twitching or lashing tail is a sign you should wait a few more minutes.
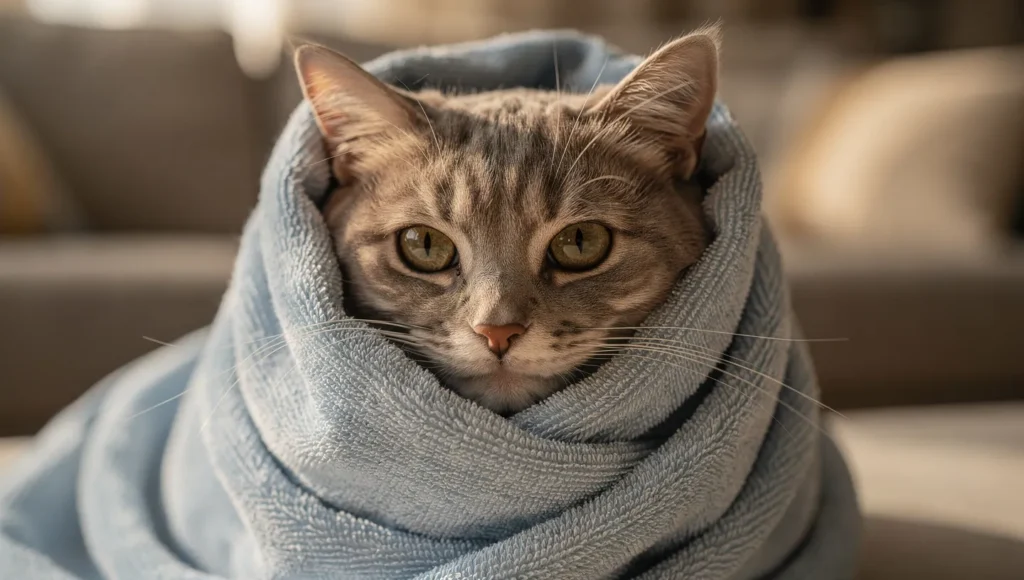
Step 2: The “Purrito” Secure Wrap
If your cat is a “wiggler,” use the “Taco Wrap” or “Purrito” technique. Wrap them snugly in a soft towel with only their head exposed. This prevents them from scratching or escaping during the cleaning cat ears session.
🌯 Expert Tip: The Purrito Technique
Using a towel isn’t about restraint; it’s about providing a sense of security. Most cats feel safer when they are “bundled,” which significantly reduces their flight reflex. This makes cleaning cat ears a much faster and safer process for both of you.
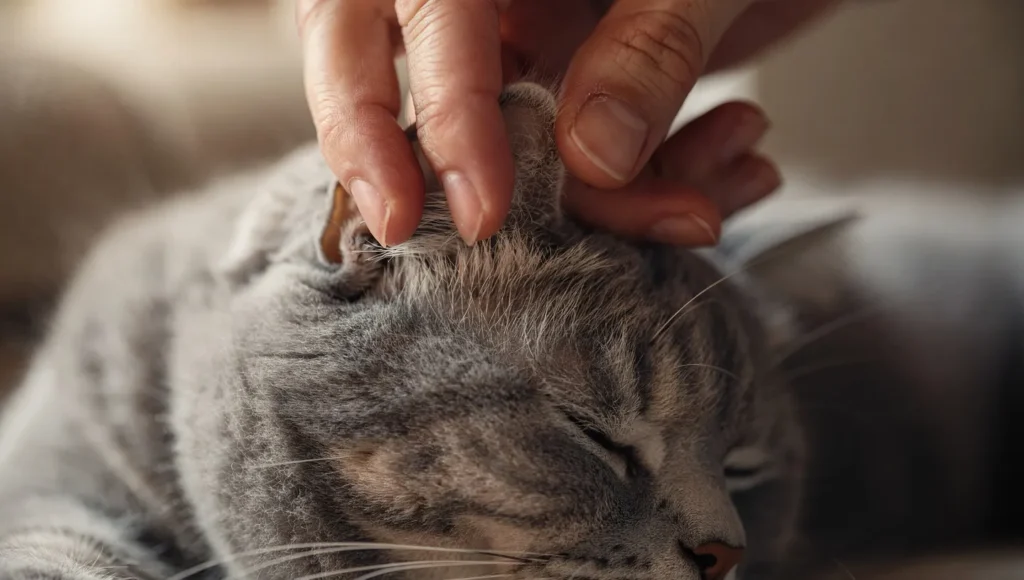
Step 3: Apply the Solution
Gently pull back the ear flap (pinna) and squeeze the cat ear cleaning solution into the ear canal as directed by the product label. Do not let the tip of the bottle touch the ear, as this can introduce bacteria back into the bottle.
Step 4: The Deep Massage
This is the most critical part of the step by step guide. Once the liquid is in, massage the base of the ear gently for about 30 seconds. You should hear a “squishing” sound—this means the solution is breaking up the deep wax and debris.
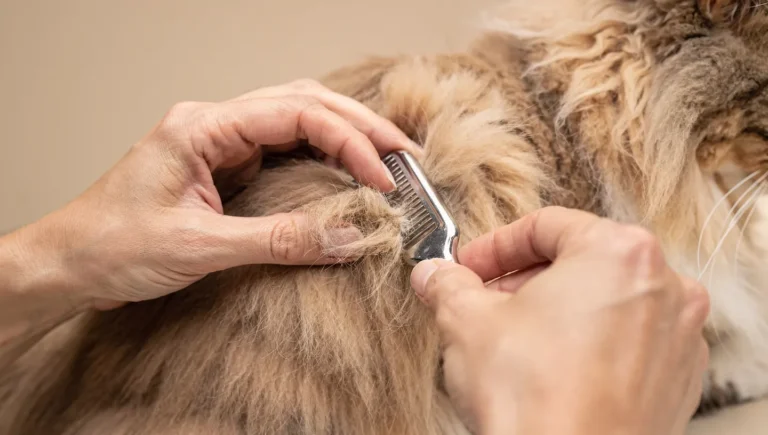
Step 5: The Shake and Wipe
Release your hold and let your cat shake its head. This natural reflex brings the loosened wax from the deep canal to the outer flap. Finally, use a clean gauze pad to wipe away the visible debris. Never go deep into the canal!
Step 6: Positive Reinforcement
Immediately after you finish, offer their favorite treats. You want your cat to associate cleaning cat ears with a delicious reward. If they start purring, you’ve done a great job! You can learn more about why do cats purr and how it aids their recovery from stress.
🚩 When Home Care Isn’t Enough: Knowing the Limits
As much as we love providing DIY care for our feline companions, there are times when cleaning cat ears at home is simply not the right answer. Recognizing the boundary between a routine grooming session and a medical emergency is part of being a responsible owner. If you notice signs of severe irritation, your cat’s ears might be too painful for a standard cleaning.
Trying to force a cleaning when an underlying infection is present can actually push bacteria deeper or cause your cat to associate grooming with intense pain. It is vital to learn how to tell if your cat is sick so you can distinguish between a dirty ear and a systemic health issue.
🚫 Red Flags: When to Stop Immediately
If you encounter any of the following symptoms during or before cleaning cat ears, put the bottle down and call your veterinarian:
- Visible Blood: Any sign of bleeding from the ear canal is a major red flag.
- Intense Pain: If your cat yelps, hisses, or tries to bite when you touch the base of the ear.
- Loss of Balance: If your cat is stumbling, tilting their head constantly, or has flicking eye movements.
- Swelling (Hematoma): If the ear flap feels like a water balloon or looks puffy and hot.
- Foul Discharge: Pus-like yellow or green discharge often indicates a bacterial or yeast infection.
🏥 The Importance of a Professional Diagnosis
While a cat ear cleaning solution works wonders for maintenance, it cannot cure an inner ear infection or remove a deep-seated foreign object like a grass seed. Organizations like the Cornell Feline Health Center emphasize that improper cleaning of an infected ear can lead to a ruptured eardrum or permanent hearing loss.
⚠️ The Golden Rule
If you are ever in doubt, don’t clean. A quick consultation with a vet is far better than accidentally causing a long-term injury. Your cat’s safety and trust are the most valuable things you have.
Preparing for the Vet Visit
Going to the vet doesn’t have to be a nightmare. Approach the situation with a calm energy. Describe exactly what you saw (odor, color of wax, behavioral changes). This helps the professional pinpoint whether the issue is related to ear mites signs or something more complex like an allergy.
❓ FAQ for Featured Snippets
Q: How often should I be cleaning my cat’s ears? A: Most healthy cats don’t need frequent cleaning. However, you should inspect them weekly. If you notice mild wax buildup, a monthly cleaning is sufficient. Always consult your vet if you notice redness or a foul odor.
Q: Can I use olive oil for cleaning cat ears? A: While some suggest it, it’s better to use a dedicated cat ear cleaning solution. Oils can leave a residue that attracts more dirt and may lead to infections if not wiped away perfectly.