I still remember the day I announced to my coworkers that I was going home to finally figure out how to trim cat nails — properly, professionally, and without any drama.
“I got this,” I told them, probably a little too confidently. Marcus looked up from his coffee and smirked. Jess didn’t even try to hide her laugh. “You? A cat groomer?” she said. “Good luck with that.”
I went home full of confidence. I’d read three articles. I watched two YouTube videos. I even bought what I thought were the right clippers. Luna was sitting on the couch looking absolutely angelic.
Forty-five minutes later, I was sitting on the bathroom floor, one nail trimmed, a tiny dot of blood on the counter, Luna nowhere to be found, and my hand looking like I’d lost an argument with a rosebush.
I called Dr. Ben — my friend, a veterinarian, and honestly one of the most patient humans alive when it comes to both cats and clueless cat owners like me. He picked up. Heard my story. And then I heard him laughing so hard he had to put the phone down.
When I walked into work the next morning, Marcus and Jess already knew. I have no idea how. But the looks on their faces said everything.
That was the moment I decided to actually learn how to trim cat nails the right way. And now — after a lot of trial, error, and gentle advice from Dr. Ben — I want to share everything I know with every cat owner who’s ever stared at their cat’s claws and thought: please, not today.
This guide is for you.
Quick note: Everything in this article is based on personal experience and research from trusted sources. It’s meant for informational purposes only and isn’t a substitute for professional veterinary advice. When in doubt, call your vet — or your own version of Dr. Ben.
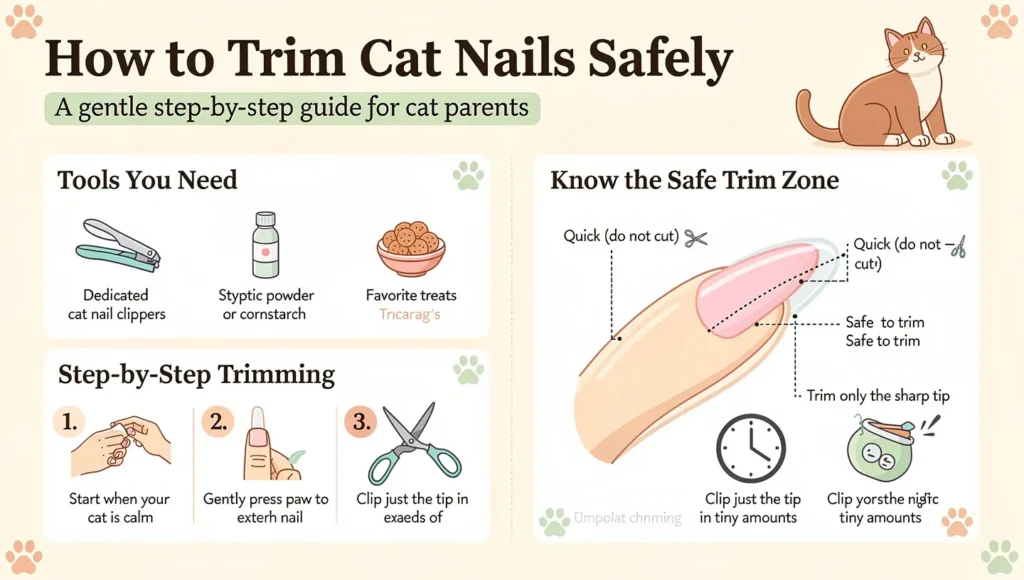
Table of Contents
- Why Most Cats Hate Nail Trimming (It’s Not What You Think)
- It’s About the Approach, Not the Cat
- What You Actually Need Before You Start
- The Right Tools Make a Huge Difference
- Understanding the Quick (This Is the Part Everyone Misses)
- How to See the Quick on Dark Nails
- How to Trim Cat Nails Step by Step
- Step 1 — Pick the Right Moment
- Step 2 — Get Your Cat Comfortable (The “Warm Burrito” Trick)
- Step 3 — Expose the Nail Properly
- Step 4 — Where Exactly to Cut
- Step 5 — One Paw, Then Done (The One-Paw Method)
- What to Do If Things Go Wrong
- You Cut the Quick — Don’t Panic
- Your Cat Bit or Scratched You
- How Often Should You Trim Cat Nails?
- Common Mistakes That Ruin Your Cat’s Trust
- Frequently Asked Questions
- How do I trim my cat’s nails alone?
- Can I use human nail clippers on cats?
- What if my cat absolutely refuses?
- Is it better to clip or grind cat nails?
- One Last Thing Before You Go
Why Most Cats Hate Nail Trimming (It’s Not What You Think)
Most cats don’t actually hate having their nails trimmed. What they hate is the way it usually happens.
Think about it from Luna’s perspective. Someone grabs her paw out of nowhere, there’s a weird clicking sound, and suddenly there’s pressure on her claws — an area that’s deeply connected to her instincts around climbing, defense, and balance. Of course she panics.
Here’s the thing. Cats aren’t being dramatic or difficult. They’re responding exactly the way their instincts tell them to. The problem isn’t the cat.
It’s About the Approach, Not the Cat
Most nail-trimming disasters happen because the human skips the most important step: building the right environment before touching a single claw.
Dr. Ben explained it to me like this — and I’m paraphrasing because he was still slightly laughing when he said it: “You don’t walk up to someone sleeping and start cutting their fingernails. Don’t do that to your cat either.”
Honestly? Fair point.
Cats read body language constantly. If you’re nervous, tense, or rushing — they feel it immediately. A stiff posture, fast movements, or a tight grip on their paw all signal danger to them. And once they’re in that headspace, it’s over.
Understanding your cat’s body language before you even pick up the clippers is one of the most underrated steps in this whole process. And if your cat tends to get reactive quickly, it’s also worth knowing the early signs of cat aggression — so you can stop before things escalate.
The good news? Once you understand why they react the way they do, the whole process becomes a lot calmer. For both of you.
What You Actually Need Before You Start
Let me save you the mistake I made on Day One.
I grabbed a pair of regular human nail clippers from the bathroom cabinet, figured “a nail is a nail,” and went in completely unprepared. That was mistake number one. Maybe number two. Honestly, the whole evening was a series of mistakes.
Cat nails are structurally different from human nails. They’re curved, layered, and much more sensitive near the base. Using the wrong tool doesn’t just make the job harder — it can actually crush the nail instead of cutting it cleanly, which is uncomfortable for your cat and increases the chances of a bad reaction.
The Right Tools Make a Huge Difference
You don’t need a lot. But what you do need matters.
The three main options:
| Tool | Best For | Pros | Cons |
|---|---|---|---|
| Scissor-style cat clippers | Most cats | Easy control, clean cut | Takes practice |
| Guillotine-style clippers | Small/medium cats | Precise | Blade dulls faster |
| Nail grinder | Cats who panic at clipping sounds | Smooth finish, no splitting | Noise can stress some cats |
| Human nail clippers | Emergency only | You already own them | Can crush/split the nail |
Personally, I now use scissor-style clippers — the kind specifically designed for cats. They give me the most control, and after Dr. Ben stopped laughing long enough to recommend a decent brand, I haven’t looked back.
A few other things worth having nearby:
- Styptic powder (or cornstarch in a pinch) — for if you nick the quick
- Cat treats — high-value ones, not the everyday kind
- A soft towel — for the “burrito wrap” technique we’ll get to shortly
- Good lighting — this one is more important than people realize
Honestly, the treats are non-negotiable. They’re not a bribe. They’re part of the training. There’s a difference.
Understanding the Quick (This Is the Part Everyone Misses)
This is where most first-timers go wrong — including me, on that legendary evening Luna will probably never forgive me for.
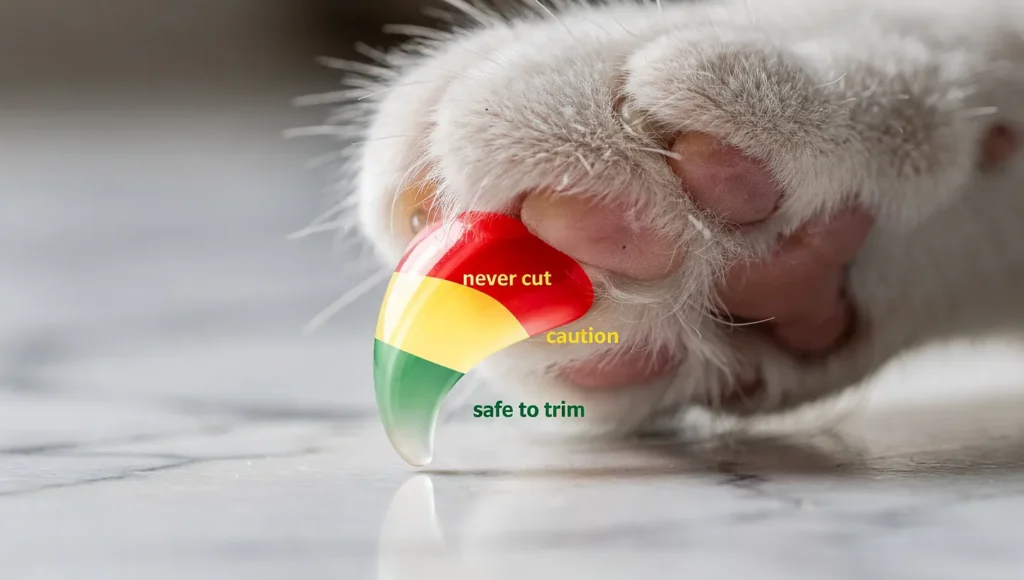
The quick is the pink, living part inside your cat’s nail. It contains blood vessels and nerve endings. If you cut into it, it bleeds, it hurts, and your cat will remember. Cats have very good memories for things that hurt.
On cats with light-colored or white nails, the quick is easy to see — it looks like a pink shadow inside the nail. You just cut the clear part beyond it, leaving a small margin of about 2 millimeters for safety.
How to See the Quick on Dark Nails
Dark nails are trickier. And this is where people panic most.
Here’s what actually works: hold a small flashlight or your phone’s flashlight behind the nail. In many cases, you’ll see a faint pink glow — that’s the quick. If you can’t see it at all, the safest approach is to trim only the very tip. Just the sharp, hooked end. That’s it.
And this is important — when in doubt, trim less. A conservative cut that keeps your cat calm is infinitely better than an aggressive cut that ends your grooming session permanently.
Think of it this way: you’re not trying to get the nail as short as possible. You’re trying to remove the sharp tip. That’s the goal. Everything else is bonus.
According to veterinary guidance, cats who’ve had a painful nail-trimming experience often develop lasting resistance — which makes every future session harder. One bad cut can set you back weeks of trust-building.
So slow down. Use the light. Cut less than you think you need to.
How to Trim Cat Nails Step by Step
Okay. This is the part you came for.
I’m going to walk you through exactly how to trim cat nails the right way — not the robotic “Step 1, Step 2” version you’ve already seen a hundred times, but the real method. The one that actually keeps your cat calm, keeps your hands intact, and gets the job done without turning your bathroom into a crime scene.
Step 1 — Pick the Right Moment
This single step is responsible for about 80% of failed attempts to trim cat nails. Timing matters more than technique.
You want your cat in a state of maximum relaxation. Think: just woke up from a long nap, belly full, purring on the couch. That post-meal, half-asleep window is golden.
What you do not want is a cat who just finished playing, is watching birds through the window, or is already in a slightly twitchy mood. You’ll know the difference. If their tail is flicking even slightly, come back later.
From my experience, Luna is most cooperative about twenty minutes after dinner. Every cat has their window. Find yours.
Step 2 — Get Your Cat Comfortable (The “Warm Burrito” Trick)
Here’s the thing — restraint done wrong feels like a threat. Restraint done right feels like a hug.
The burrito method works beautifully for cats who get wiggly. Wrap your cat gently but snugly in a soft towel, leaving one paw out at a time. The pressure is actually calming for many cats — it mimics the feeling of being held securely, which reduces that frantic “I need to escape” energy.
For calmer cats, you can simply place them on your lap with their back against your chest, facing away from you. One arm rests gently across their body. No squeezing. No tension in your arms. The calmer you are, the calmer they’ll be.
And breathe. Seriously. Cats read tension in your body before you even realize you’re feeling it. If you’re nervous, they’re nervous.
Step 3 — Expose the Nail Properly
Cat nails are retractable, which means you can’t just grab a paw and start cutting. You need to gently press the top of the paw between your thumb and index finger — a light squeeze that extends the nail forward naturally.
Don’t force it. Don’t yank. Just a gentle, confident press. The nail will slide out.
Practice this a few times without the clippers first. Do it while watching TV. Do it while Luna — or whatever your cat’s name is — is half asleep on your lap. Get them used to the feeling of paw-handling before you introduce any tools at all.
Step 4 — Where Exactly to Cut
Look at the extended nail. You’ll see the curved tip — that’s your target. You want to cut just the hook. The sharp, curved end that catches on fabric, skin, and everything else.
Leave at least 2 millimeters from where the pink quick begins. If you’re unsure, leave more. As I mentioned before, a conservative trim beats a bleeding nail every single time.
Position your clippers perpendicular to the nail — not at an angle. A straight, clean cut reduces splitting. One smooth, confident squeeze. Don’t hesitate once you’ve positioned the clipper, because hesitation leads to a slow cut, which is more uncomfortable for your cat.
Step 5 — One Paw, Then Done (The One-Paw Method)
This is the advice Dr. Ben gave me the night I called him in mild panic, and it genuinely changed everything.
“You don’t have to do all four paws in one sitting,” he said, once he’d recovered from laughing. “Do one paw. Give her a treat. Put the clippers away. Come back tomorrow.”
I remember thinking that sounded ridiculous. Surely it’s more efficient to just power through all twenty nails at once, right?
Wrong. So wrong.
The One-Paw Method works because it keeps the experience short and positive every single time. Your cat never reaches the point of real stress. They associate the clippers with: short experience, treat, done. Over a few weeks, the whole thing becomes almost boring for them. And boring is exactly what you want.
I told Marcus and Jess about this approach the next day at work. Marcus looked genuinely impressed for about three seconds before Jess reminded everyone about the bathroom incident. But even she admitted it actually made sense.
Treat after every paw. Every single time. No exceptions.
According to the ASPCA, positive reinforcement during grooming is one of the most effective ways to build long-term cooperation in cats — and it works regardless of your cat’s age or history.
If your cat allows two paws in one sitting — great. If they only tolerate one nail before they’re done — that’s also fine. Work with your cat, not against them.
What to Do If Things Go Wrong
Most people get this wrong. They panic, they freeze, or they do the one thing that makes everything worse — they keep going.
If something goes sideways during a nail trim, the rule is simple: stop, assess, respond calmly.
You Cut the Quick — Don’t Panic
It happens. It happened to me. It’ll probably happen to you at least once.
If the nail starts bleeding, press a small amount of styptic powder directly onto the tip of the nail. Hold gentle pressure for about 30 seconds. If you don’t have styptic powder, plain cornstarch works as a backup — press a pinch of it firmly against the nail tip.
The bleeding usually stops within a minute or two. Your cat will be unhappy. Give them space, offer a treat once they’ve calmed down, and do not attempt another nail that session.
Do not use a tissue and just “hope it stops.” Do not blow on it. Do not run it under water. Just powder, pressure, patience.
If bleeding continues for more than five minutes, call your vet.
Your Cat Bit or Scratched You
First — are you okay? Genuinely. Cat scratches and bites can get infected quickly, so clean the area with soap and water immediately, even if it looks minor.
Second — don’t punish your cat. I know that sounds hard when you’re bleeding and frustrated, but punishment after a bite that happened during restraint will only teach your cat that nail-trimming sessions end in conflict. That’s the opposite of what you want.
What actually happened is that your cat hit their stress threshold and communicated it the only way they could in that moment. Next time, watch for the earlier signals — the flattening ears, the low tail, the skin rippling along the back. Those are the warning signs that come before the bite.
For more on reading those early signals, the guide on cat aggression signs breaks them down clearly — and understanding them genuinely changes how you interact with your cat during any kind of handling.
The AVMA also recommends that if your cat consistently reacts with biting or extreme distress during grooming, it’s worth discussing with your vet — there may be an underlying sensitivity or anxiety that’s worth addressing properly.
How Often Should You Trim Cat Nails?
Most cat owners either forget to trim cat nails until the furniture looks like abstract art,
or they try to trim too often and burn through whatever goodwill they’ve built with their cat.
Here’s a simple guide based on your cat’s lifestyle:
| Cat Type | Recommended Frequency | Why |
|---|---|---|
| Indoor cat (adult) | Every 2–3 weeks | Nails grow faster without natural wear |
| Outdoor cat (adult) | Every 4–6 weeks | Natural surfaces help file nails down |
| Kitten (under 1 year) | Every 1–2 weeks | Nails grow faster + builds early habit |
| Senior cat (10+ years) | Every 2 weeks | Nails thicken and curve more with age |
| Declawed cat (front paws) | Check rear paws every 3 weeks | Often overlooked |
Personally, I do Luna every two and a half weeks. I put a small reminder on my phone.
Not because I’ll forget — but because without it, I always tell myself “I’ll do it tomorrow” until suddenly she’s snagging the couch again.
One thing worth knowing: senior cats especially need more frequent checks.
As cats age, their nails can grow thicker and start curling, which becomes genuinely uncomfortable if left too long. If your cat is getting older, the guide on senior cat care
covers a lot of the health shifts that start happening and what to watch for.
Common Mistakes That Ruin Your Cat’s Trust
Most people get this wrong — and they don’t even realize it until the damage is done.
These aren’t just tips. These are the specific mistakes people make when they try to trim cat nails at home, and they turn a nervous cat into an impossible cat. Avoid them.
- Trimming when your cat is already stressed.
If they just had a bath, a vet visit, or a loud afternoon — reschedule.
A cat who’s already at 80% stress capacity will hit their limit after one nail. - Doing all four paws in one session, every time.
Especially in the beginning. The One-Paw Method exists for a reason. Use it. - Using dull clippers.
Dull blades crush and split the nail instead of cutting cleanly.
That sensation is uncomfortable even when you miss the quick entirely.
Replace blades or buy new clippers every few months. - Skipping the treat.
This is not optional. The treat is what rewires the association in your cat’s brain
from “threat” to “short, okay thing that ends with something good.”
Without it, you’re just doing damage control every single session. - Reacting loudly if something goes wrong.
A gasp, a curse word, a sudden movement — all of these startle your cat
and confirm their suspicion that something bad just happened.
If you nick the quick, take a quiet breath first. Then act. - Forcing it when the cat is clearly done.
This is where the biting happens. Watch the body language.
A lashing tail, flattened ears, or skin twitching along the spine
are all your cat saying I’m at my limit.
Respect it. There’s always tomorrow.
Understanding these signals becomes much easier once you start reading your cat’s posture as a whole — the guide on cat posture meaning
is genuinely one of the most useful things you can learn as a cat owner,
not just for nail trimming but for everyday life with your cat.
This is where things change for most owners.
Once you stop seeing resistance as stubbornness and start seeing it as communication — everything gets easier.
Frequently Asked Questions
How do I trim my cat’s nails alone?
Totally doable. Use the lap method — cat facing away from you, your non-dominant arm resting gently across their body. Work one paw at a time.
If your cat is very squirmy, the towel burrito method works well for solo sessions.
The key is starting with the One-Paw approach so sessions stay short enough to manage alone.
Can I use human nail clippers on cats?
In an absolute emergency, yes — but it’s not ideal.
Human clippers are flat and designed for a different nail shape.
On curved cat nails, they tend to crush or split rather than cut cleanly. Invest in a proper pair of cat clippers. They’re inexpensive and make a real difference.
What if my cat absolutely refuses?
Start smaller. Don’t even bring out the clippers yet. Spend a week just handling your cat’s paws daily — press gently to extend the nails, release, treat. No cutting. Just desensitization.
Some cats need two or three weeks of this before they’re ready.
Patience here saves you months of struggle later. If your cat remains extremely reactive, it’s worth a conversation with your vet — sometimes there’s an underlying issue making touch more uncomfortable than it should be. You can also look into whether soft claw caps
might be a temporary solution while you work on desensitization.
Is it better to clip or grind cat nails?
Both work. Clippers are faster and most cats tolerate them well once accustomed. Grinders give a smoother finish and eliminate the risk of splitting —
but the noise and vibration stress some cats out more than the clipping sound. If your cat is particularly sensitive to sound, start with clippers. If they hate the click but don’t mind buzz, try a grinder. Let your cat’s reaction guide the decision.
One Last Thing Before You Go
So here we are.
If you’d told me a year ago that I’d write a guide on how to trim cat nails —
after that legendary bathroom incident, after the call to Dr. Ben, after walking into work the next morning to find Marcus and Jess already whispering and grinning before I’d even taken my coat off — I probably would’ve laughed.
But honestly? That disaster was the best thing that could’ve happened.
It pushed me to actually learn how to trim cat nails properly instead of winging it
with bathroom scissors and overconfidence.
So to Marcus, who has never once let me live it down — thank you.
To Jess, who still does the “Luna face” impression at team lunches — thank you too.
And to Dr. Ben, who answered my panicked phone call, laughed for a full minute, and then gave me the best cat grooming advice I’ve ever received — you have no idea how many cats you’ve indirectly helped by helping me.
Here’s my honest advice for you:
Start with one nail. Just one.
Treat your cat. Put the clippers away. Do it again tomorrow.
That’s it. That’s the whole secret. No drama, no wrestling match, no crime scene in the bathroom.
Just small steps, a little patience, and a lot of treats.
Luna is currently asleep on the couch, all twenty nails perfectly trimmed, completely unbothered. And I did that. You can too.
If this guide helped you — or if you have your own nail-trimming disaster story that puts mine to shame (I genuinely hope you do) — drop it in the comments below. I read every single one, and I’m already looking forward to hearing that I’m not alone.
Share this with a fellow cat owner who needs it.
They’ll thank you. Their furniture will thank you even more.
For more on keeping your cat healthy and happy at home, check out the full guide on
how to brush your cat
and
cleaning cat ears safely
— two grooming routines that go hand in hand with nail trimming.